Summary
The NOVAtime system’s time-off request process has always allowed employees to request time off with a single level of approval. Today the system can continue to use the single approval level, or it can be configured to use 2-99 approval levels depending on the request pay code and the employee’s and system user’s security access. Vacation requests, for example, could require approval by the employees’ immediate supervisor and then department manager; whereas other requests such as a personal day may only require approval from the employee’s immediate supervisor. Requests for some employees could bypass approval and a submitted request will be automatically approved in the system.
This document provides a step-by-step procedure to enable and utilize multiple PTO approval levels.
Feature Setup
The following is for configuring the system to utilize the multiple level time-off request approval features:
1. Login into Administrator Web Services (AWS)
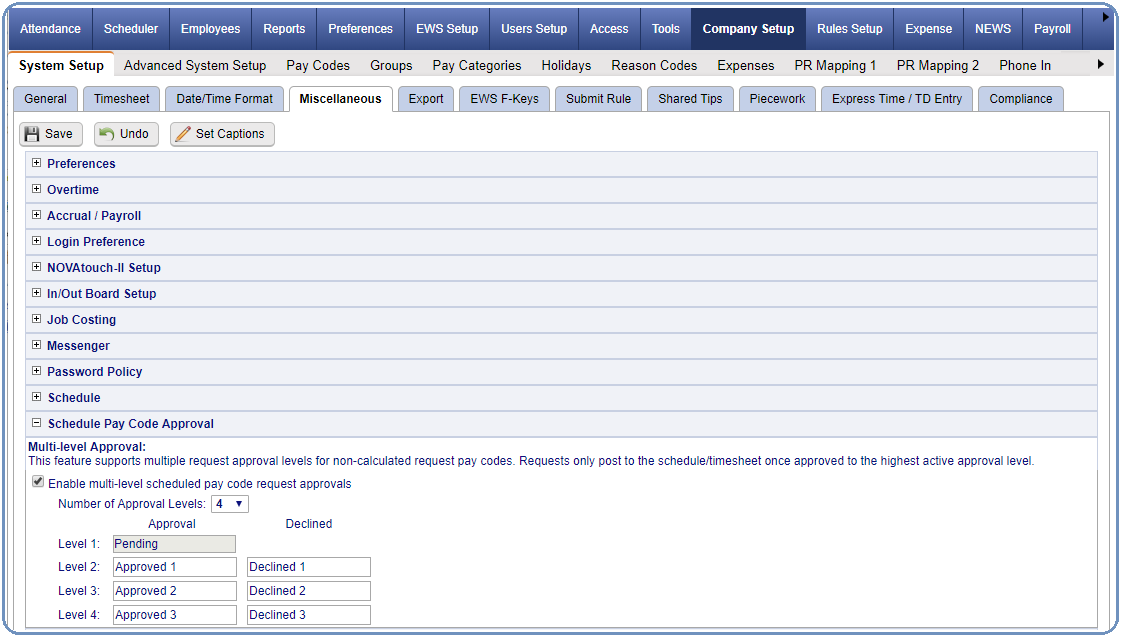
2. Navigate to the Company Setup>System Setup>Miscellaneous page and open the Schedule Pay Code Approval section. Select “Enable multi-level scheduled pay code request approvals,” select the maximum number of approval levels (2-99), and enter the Approval and Declined captions (20 characters max) for each level and save the page.
Note: Once this feature is selected, the configuration needs to be completed before the system will allow the approval or status changes to any existing employee time-off requests.
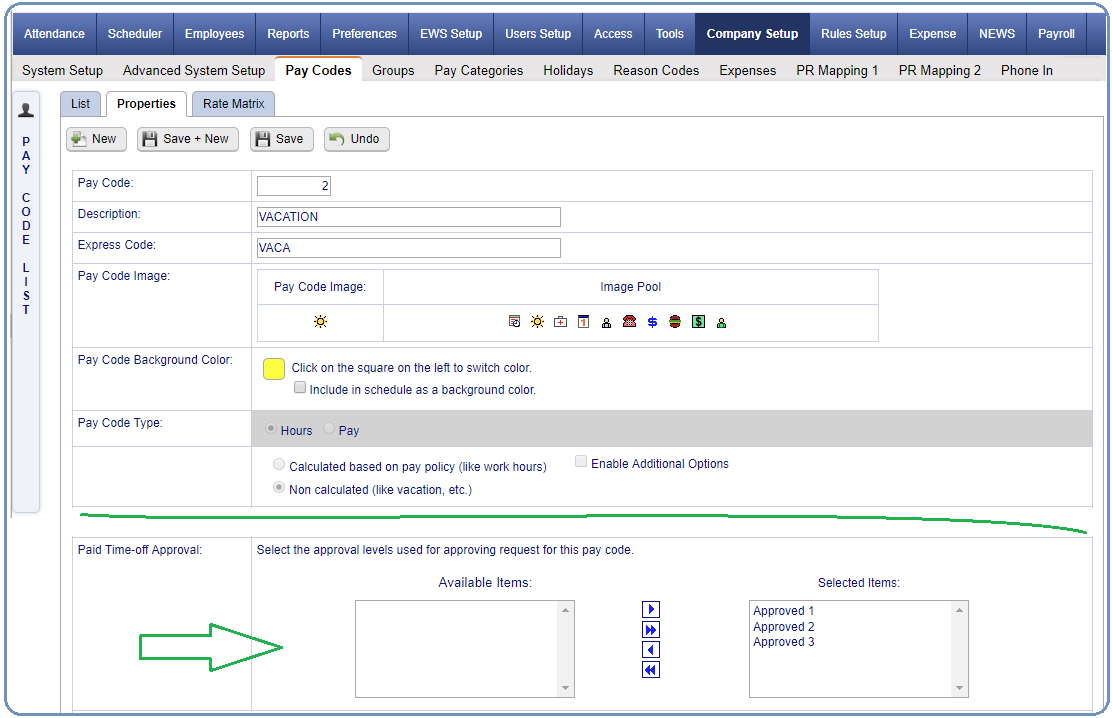
3. Navigate to the Company Setup>Pay Codes>Properties page, select a pay code that is used for employee time-off requests (non-calculated hours pay codes only), and locate the “Paid Time-off Approval” section. By default the highest active approval level is already selected, but is can be moved to “Available Items” when not applicable where other required approval levels are selected instead.
Repeat this process for all time-off request pay codes.
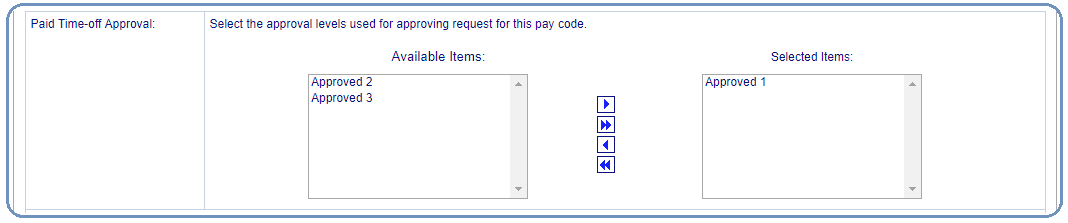
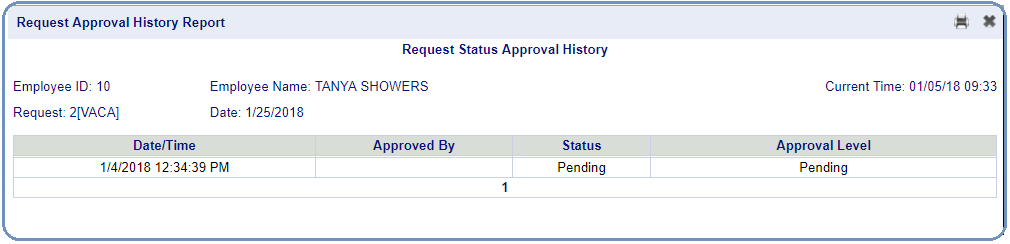
Note 1: A request is only considered approved (posts to the schedule/timesheet) when the request has been approved at the highest approval level configured for use with the pay code. In the first sample below, the request is technically considered as pending until it is approved to the “Approved 3” approval level. In the second (partial) sample below, the request is considered approved once it is approved to the “Approved 1” approval level.
Note 2: When a request pay code does not contain the approval level assigned to a system user, the system user will not be able to approve or change the status of a request for that pay code.
Note 3: When a request pay code does not contain the approval level assigned to an employee (except “Pending,” the employee will not be able to submit a request (using EWS) for that pay code.
(Sample 1)
(Sample 2)
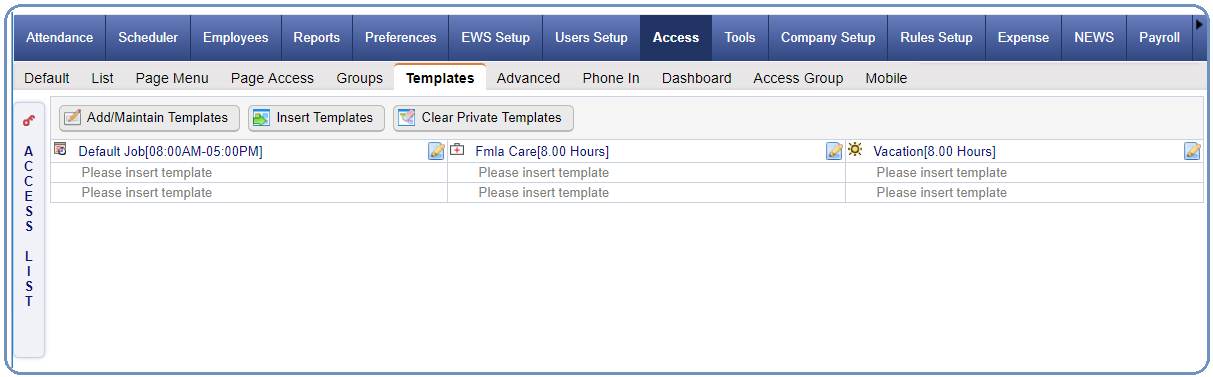
4. (Optional – Hardware / NOVAmobile Time-Off Requests) Navigate to the Access>Templates page for employee access groups. Create the PTO templates using pay codes that employees are allowed to use to request time-off.
Note: In cases where a configured template is using a pay code that is not assigned to the employees’ assigned PTO approval level (when the assigned employee level is not “Pending”), the employee will be allowed to make the request using that template and the request will be at the “Pending” approval level (regardless of the PTO approval level assigned to the employee). This case needs to be avoided, because it could cause a problem in cases where the employee’s assigned approval level is above “pending.”
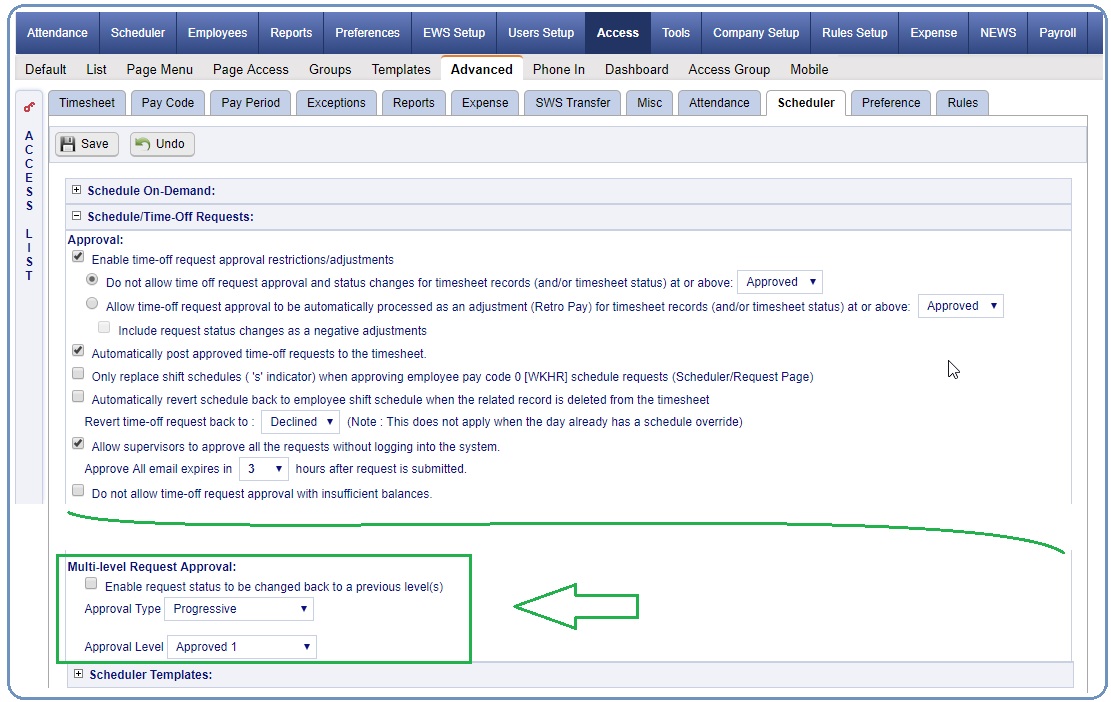
5. Navigate to the Access>Advanced>Scheduler page and open the Schedule/Time-Off Requests section. This section is used to assign system users to their approval type and level with an option to allow them to change approved requests to a previous level.
a. Enable request status to be changed back to a previous level(s): Select this option to allow system users to change the status of requests already approved to their assigned approval level.
b. Approval Type (AWS/SWS only – standard and delegate access groups):
i. Progressive (default – typically manager/supervisors): Select for system users who must wait for the request to be approved one-level (based on each individual pay code’s approval levels) below their assigned approval level before they can approve the request.
ii. Override (typically payroll admin): Select to allow system users to approve request that are at any lower approval level.
c. Approval Level:
i. AWS/SWS: Select the system users’ assigned approval level.
1. Note: When a request pay code does not contain the approval level assigned to a system user, the system user will not be able to approve or change the status of the request.
ii. EWS: Select the employees’ assigned approval level (pending by default).
1. Notes:
a. When employees are assigned to a pay code’s highest approval level, all of their requests using that pay code will be automatically approved to the employees’ schedules. The “Post Schedule Paycode Hours” process need to be run to post the request to the employees’ timesheets.
b. When employees are assigned to any approval level (other than “Pending”) that is not configured for a particular pay code, the employees will NOT be able to submit a request using that pay code.
Repeat this process for all access groups as needed. Make sure that all pay code approval levels have an access group assigned to each PTO approval level.
(AWS/SWS)
(EWS)

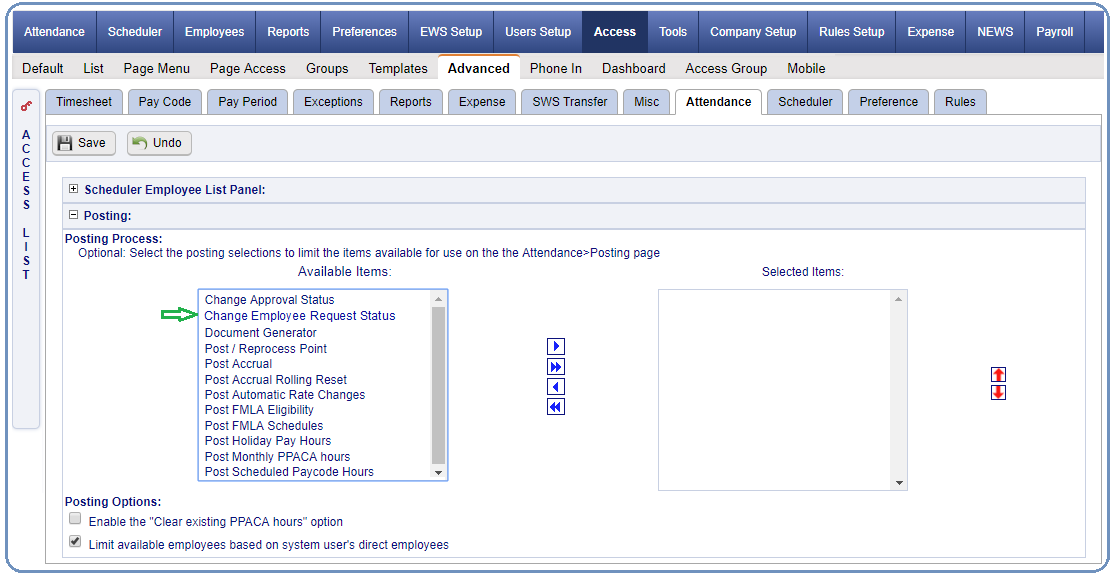
6. (Optional) Navigate to the Access>Advanced>Attendance page and open the Posting section. A new posting item “Change Employee Request Status” was added for system users (typically payroll admin) to change the request status for one or more employees when there was a mistake in the normal approval process. In most cases payroll admin already has access to all posting options (all in “Available Items”); if not be sure to select the new posting item.
7. (Optional) Navigate to the Rules Setup>PTO Bidding Rules>Properties page and open the General section. Select the “Enable multi-level request approval for approved and finalized PTO bids” option when approved finalized PTO Bids must then go through the multi-level PTO approval process.

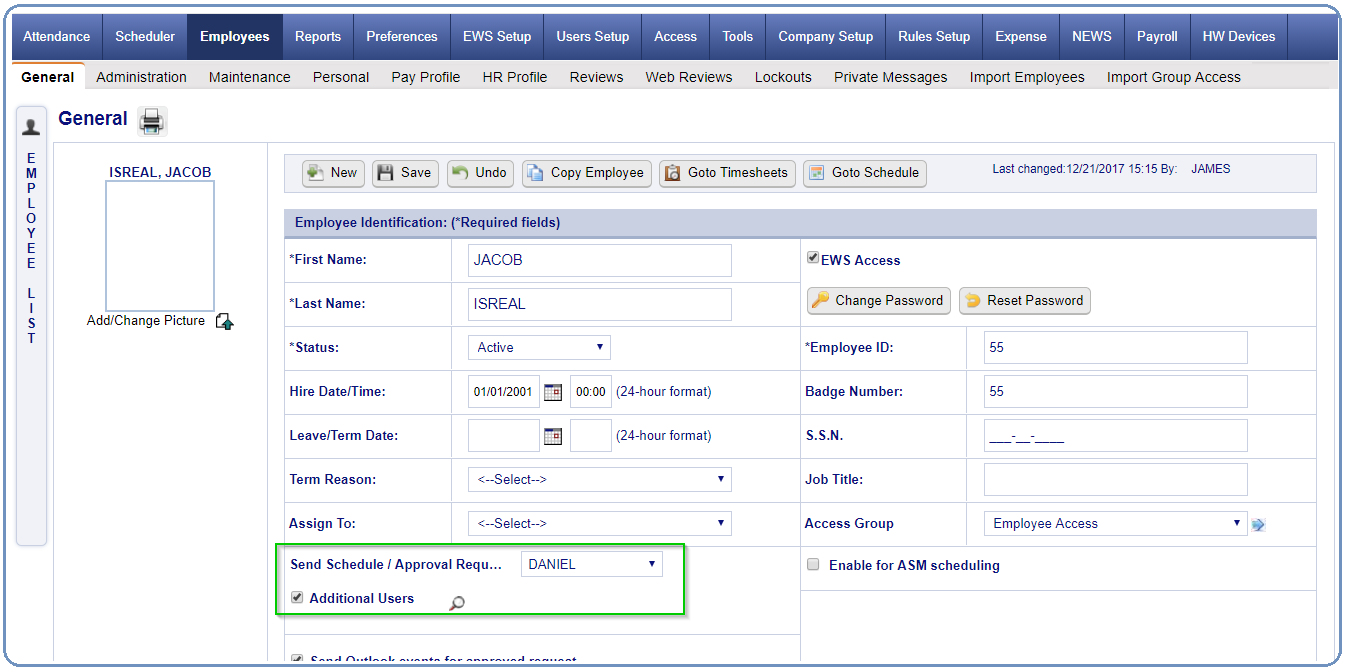
8. Employee Setup: It is time to determine who will be involved in each employee’s PTO request process. When an employee makes a request, the system will send a message/email to the system user(s) assigned to the next PTO approval level. This can be accomplished to some degree in the employee import processes (Web API, import), but in many instances it is accomplished by configuring each employee as needed.
It is important to note that all system users (Send Schedule / Approval Request to, Additional Users, and active Delegates) who are assigned to the same PTO approval level (access setup) will receive the same message/email at the same time when it comes time to approve the request at that level.
a. Standard System Users:
i. Navigate to the Employees>General page and select the following:
1. Send Schedule / Approval Request to: This will likely be the employee’s direct report (supervisor):
2. Additional Users: Select all other non-delegate system users who may or will also be involved in the approval process. In cases where the employee’s direct report is absent, for example, and is not using the delegation feature. An additional user assigned to the same PTO approval level will be alerted of the request and can approve it as well.
ii. Note: Other than sending the messages/emails to the selected system user(s), any system user who can approve an employee’s request must have access to that employee (Users Setup>Employees page). This means that a system user may be able to receive messages and emails, but with no access to the employees he or she will not be able to view the employees’ requests – let alone approve them.
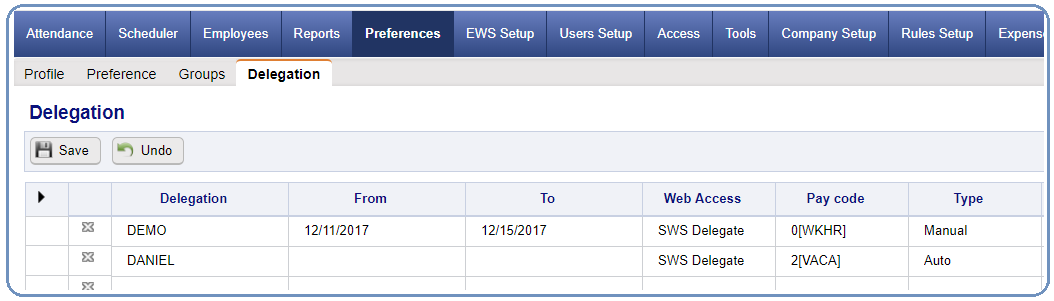
b. Delegate System Users (optional): Please contact your support representative for specific configuration instructions.
i. Any time a request message/email reaches the next PTO approval level assigned to an “active” delegate system user assigned to the next level, he or she will also receive the message/email.
1. Manual Delegation Method: The delegate will receive the message/email when the delegate is active on the date the system is sending out the message/email based on the delegate’s configured delegation From/To date range. In the example below, “Demo” will only receive approval messages/emails when the system sends them out from 12/11/2017 - 12/15/2017.
In other words, unless the delegate for the next PTO approval level is considered active by the system on the date the next level’s message/email is being sent, the delegate will not receive the message/email.
2. Automatic Delegation: The delegate is active on the date the system is sending out the message/email based on the delegate’s configured delegation From/To date range and automatic delegation pay code, and the delegator’s timesheet contains that pay code on the day. In the example below, “Daniel” will only receive approval messages/emails whenever the system sends them out on a day that the delegator has a “2[VACA]” record already in the timesheet for that specific day.
In other words, unless the delegate for the next PTO approval level is considered active by the system on the date the next level’s message/email is being sent, and the delegator has the automatic delegation pay code in their timesheet on that day before the message/email is triggered, the delegate will not receive the message/email.
Feature Use
Once the system is configured it is ready for use.
1. Employees: Employees simply make PTO requests as usual. There are a few key points to remember:
a. Throughout the system (software, NT7000, NOVAmobile) all requests will be considered as “pending” until approved to the pay code’s highest approval level.
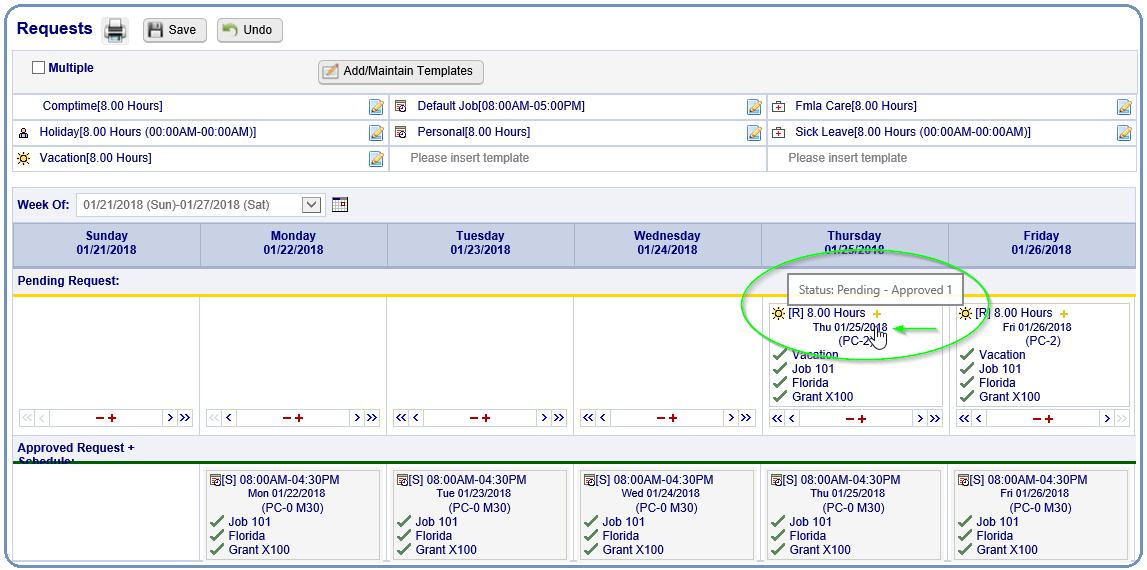
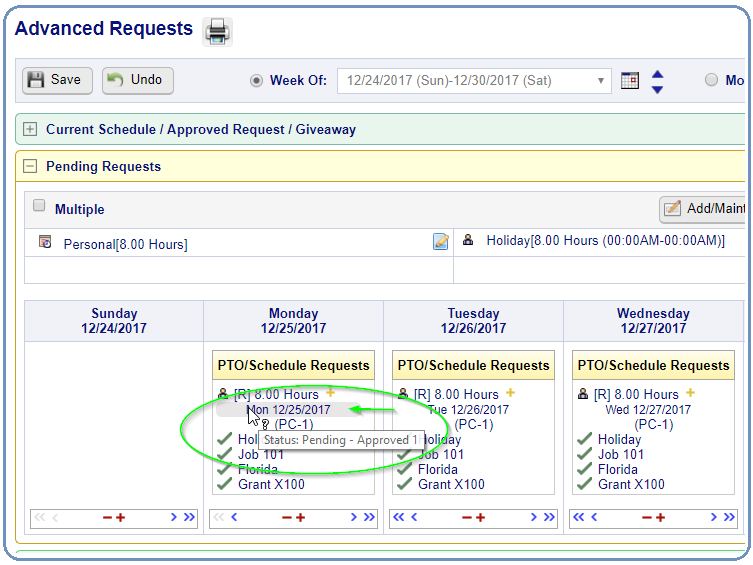
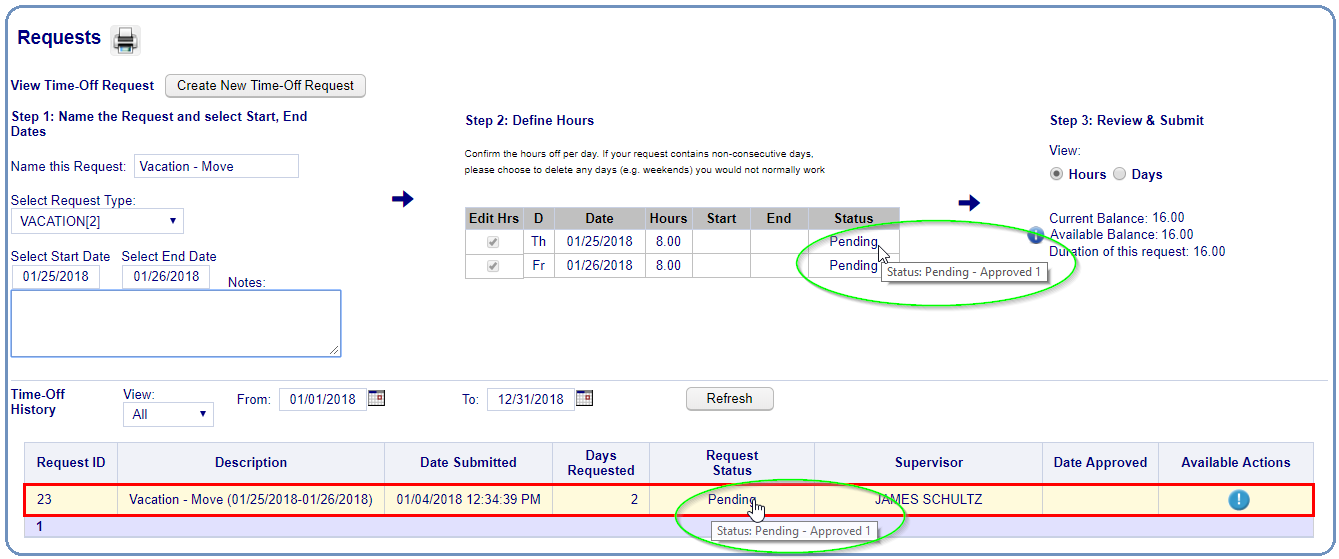
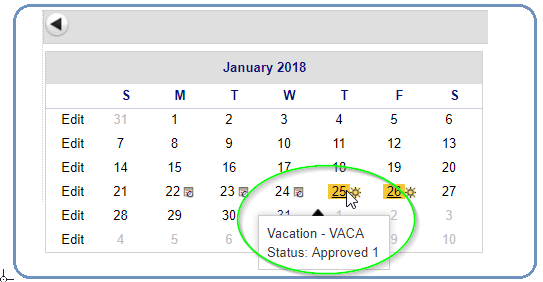
i. Requests (template-style), Advanced Requests, and Calendar Pages: Placing the mouse pointer over the request record’s date will display the current approval status of the request.
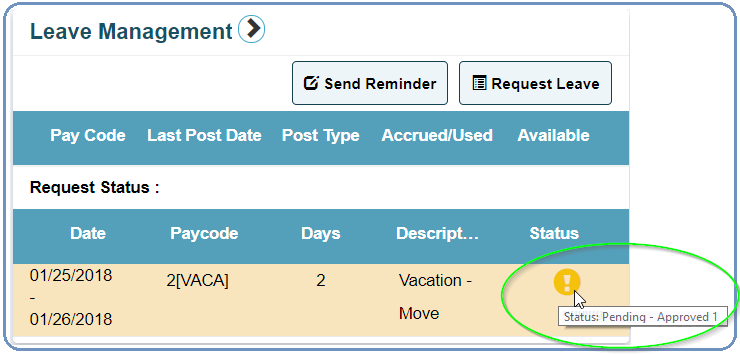
ii. Requests (calendar-driven style) Page and Dashboard (EWS) Leave Management: Placing the mouse pointer over the request record’s status will display the current approval status of the request.
b. Requests for employees who are assigned the pay code’s highest approval level do not require approvals for that pay code.
i. The request is automatically approved and will appear in the employee’s schedule
ii. The request will post to the employee’s timesheet only by running the “Post Scheduled Paycode” option in the Attendance>Posting page.
(Requests Page - Template-Style)
(Advanced Requests Page)
(Requests Page - Calendar-Driven Style)
(Calendar Page – January)
(Dashboard (EWS) – Leave Management)
2. Supervisors (System Users): Supervisors approve time-off requests based on the current approval level of the requests and their assigned PTO Approval Type and Approval Level. Supervisors must also have access to the employees in the system to view and approve the requests (Users Setup>Employees page).
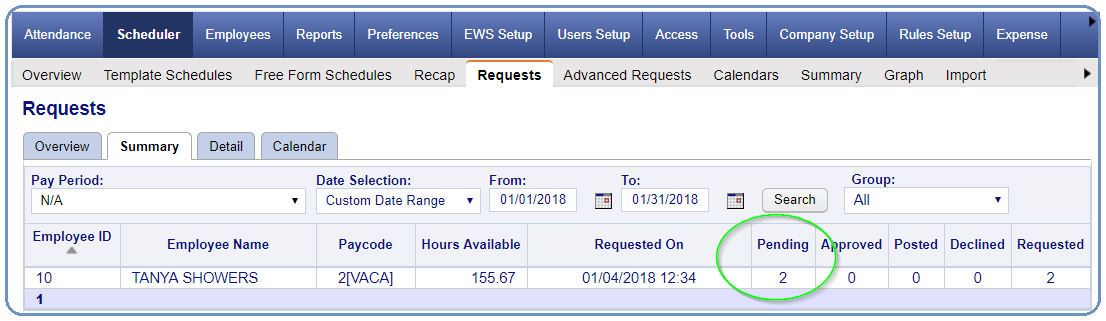
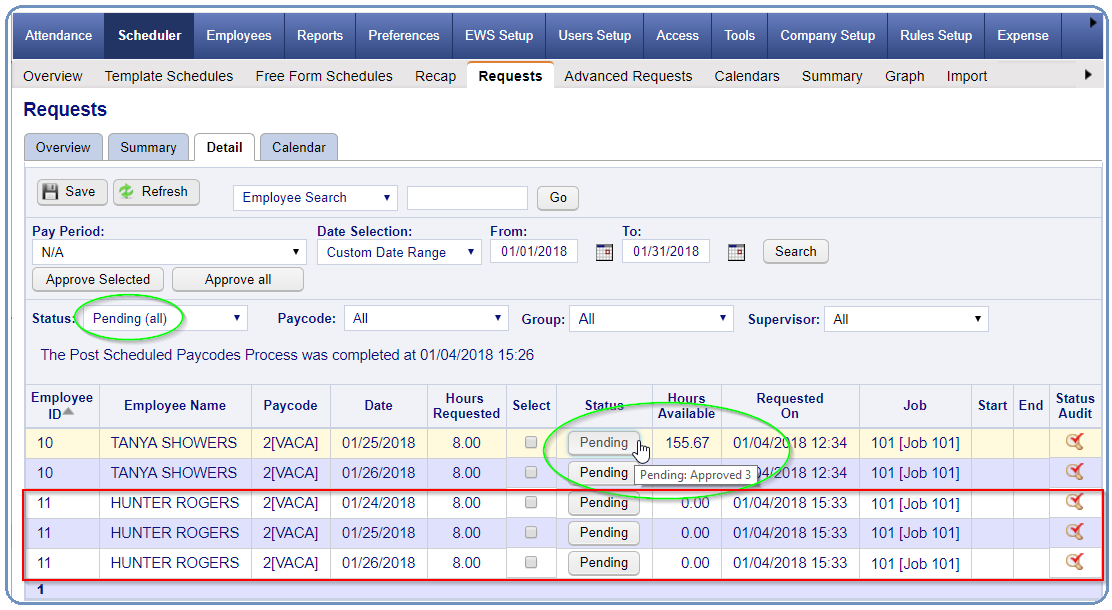
It is important to remember that the three categories of approval (Pending, Approved, and Declined) that are displayed as legends or summaries for the requests have not changed. Any request that has NOT been approved to the highest PTO approval level of the pay code will be classified as “Pending.” In the example below, Tanya’s vacation requests have been approved to “Approved 1,” but since “Approved 1” is NOT the pay code’s highest approval level it is still categorized as “Pending.”
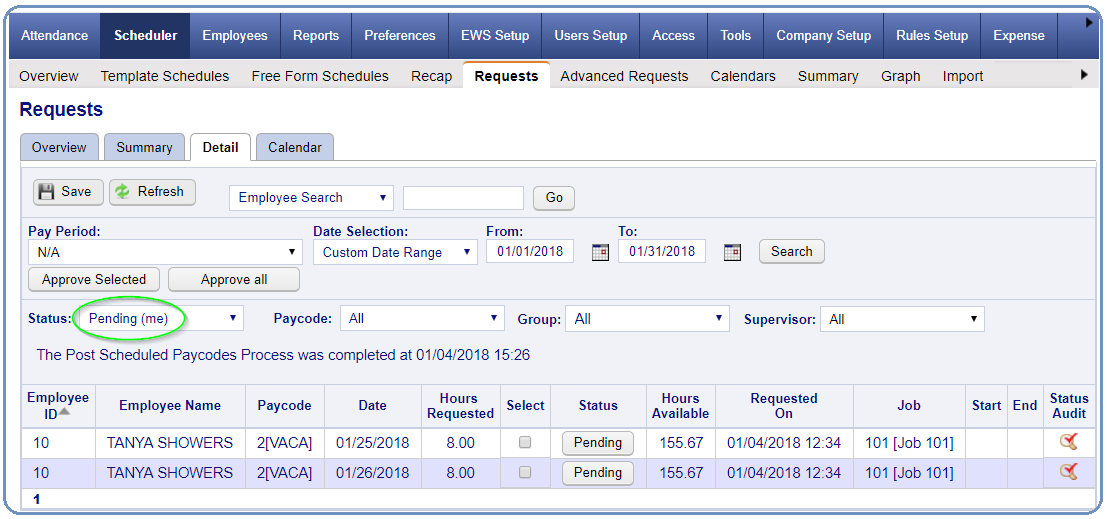
a. Dashboard – Timeoff Request Gadget: The gadget will now only display employee PTO request that are ready for your approval. Click on the record and the system will navigate you directly to the Scheduler>Requests>Details page as usual.
i. Approval Type – Progressive: Anyone assigned as progressive will only see pending requests that are one approval level below their assigned level — and only for pay codes that contain their assigned approval level.
ii. Approval Type – Override: Anyone assigned as override will see all pending requests that are below their assigned approval level — and only for pay codes that contain their assigned approval level.
b. Approval Type – Progressive: Anyone assigned as progressive can only take action on a PTO request when it is one approval level below their assigned level for the pay code — and only for pay codes that contain their assigned approval level. They can see all requests, but they will not be able to take any action on them.
c. Approval Type – Override: Anyone assigned as override can take action on a PTO request at any time as long as the request is at or below their assigned approval level, but only for pay codes that contain their assigned approval level. Override system user can bypass the lower approval levels as needed.
d. Request Status Filters (changes): The status selection filters now include “Pending (Me)” and “Pending All” (instead of just pending).
i. Pending (Me): Regardless of your assigned approval type, this filter will only display pending employee requests that are one level below your assigned level. It means that they are ready for your approval.
e. Status Audit: Click a request record’s Status Audit column to review the approval history for the request record. It includes a print button for use when a printed copy is required.
f. Pending (All): Regardless of the assigned approval type, this filter will display all pending employee requests that are below your assigned level – even when it is not your turn in the approval process.
In the example below (also reference the Pending (Me) example), you can now see requests from another employee (Hunter) as well as the requests from Tanya. Move the mouse cursor over a record’s Status column to see its current approval level.
Note: When assigned to the “Override” Approval Type, you are able to approve requests at any approval level (below yours and based on pay code approval levels) to any level (up to your assigned level) when using the Pending (All) status filter. This is generally used to approve for other system users who may not be available to approve a request to their level.
g. Approving Requests:
i. Approving Selected: The page will only allow you to click on the “Select” column for records that are ready (or allowed) for your approval.
ii. Approving All: The page will only allow you to approval all records that are ready (or allowed) for your approval. All other records will remain unchanged.
i. Approving by Status: Clicking on the Status column for a request record will always bring up the status change display, but you will only be allowed to change the status of a request that is ready (or allowed) for your approval and that is below your approval level.
a. Progressive Approval Type: Select Approved, Declined, or Remove as usual. Once the record is approved to your assigned approval level or higher, you won’t be allowed to make any changes.
b. Override Approval Type: Unlike the progressive approval type, override approval allows you to select any of the request’s approval levels. This will allow you to approve a record to a specific level up to your assigned approval level; along with Declined or Remove as usual. Once the record is approved to your assigned approval level or higher, you won’t be allowed to make any changes.
3. Administrators: This program includes a new posting utility called “Change Employee Request Status” that was designed for system administrators to change the status of multiple PTO requests when someone inadvertently changed multiple requests to the wrong status. A good example would be the payroll administrator accidentally approving all PTO requests—not just their direct employees. If you just need to change a couple of request, do NOT use this posting utility.
Note: This posting utility does NOT use the system user’s approval type or assigned approval level to limit the request approvals or changes. This means that anyone with access to this utility can approve requests to any approval level or make changes at any time, and therefore only administrative personnel should have access to this utility.
a. Special Options:
i. Request Paycode: Select the PTO request pay code.
ii. Change Status From: Select the current status of the PTO requests that you want to change. You can select more than one current status level.
iii. To: Select the new status that you want to change the PTO requests to.
b. Date Range: Select the appropriate date range.
c. Filter: Select any filters as needed
d. Click the Process button.